How to Build a Budget Home Recording Studio for Musicians
Table of Contents
Hey, fellow musician! Dreaming of recording your own tracks at home? Good news – you don’t need Abbey Road or $10,000 to make it happen. Even Billie Eilish laid down her Grammy-winning debut in a bedroom studio. Thanks to modern tech, “you can record, produce, and mix without dropping thousands of dollars right out of the gate”. In fact, as Audient notes, “a studio can be cheap without sounding cheap”. With a few smart picks and some elbow grease, a budget home recording studio is totally doable – even for beginners. Think of it as grabbing chai with a buddy who’s figured this stuff out; it’s all practical tips, no jargon. Let’s get started!
Choose and Treat Your Space
First, find the quietest corner you have. A walk-in closet, under-stair nook or the far end of a room (away from street and neighbors) works great. High ceilings and uneven walls help too, but don’t stress if you only have a tiny square room. The trick is to tame echoes and block noise. You might already have what you need: hang thick curtains or moving blankets over windows and walls, and lay down rugs or carpet on the floor. These soft surfaces will dampen sound cheaply. Even piling bookshelves or a couch against walls will help absorb reflections. A few strips of weather-stripping on doors or a draft-snake under a door can stop outside noise.
For echoes, basic acoustic panels or DIY foam can do wonders. You can actually make your own panels by cutting up old mattress foam or sleeping on egg crates glued to cardboard. Heck, even pillows or quilting that hang on a wall will slightly soften your sound. The idea is to stop sharp echoes – “some basic acoustic treatment makes a noticeable difference”. In short, think blankets, curtains, rugs and foam. These budget-friendly fixes (like soundproof curtains and rugs) can radically improve your recording. You’re not building a vault, just giving yourself a quieter, less echoey corner where your vocals and guitar can come through clearly.
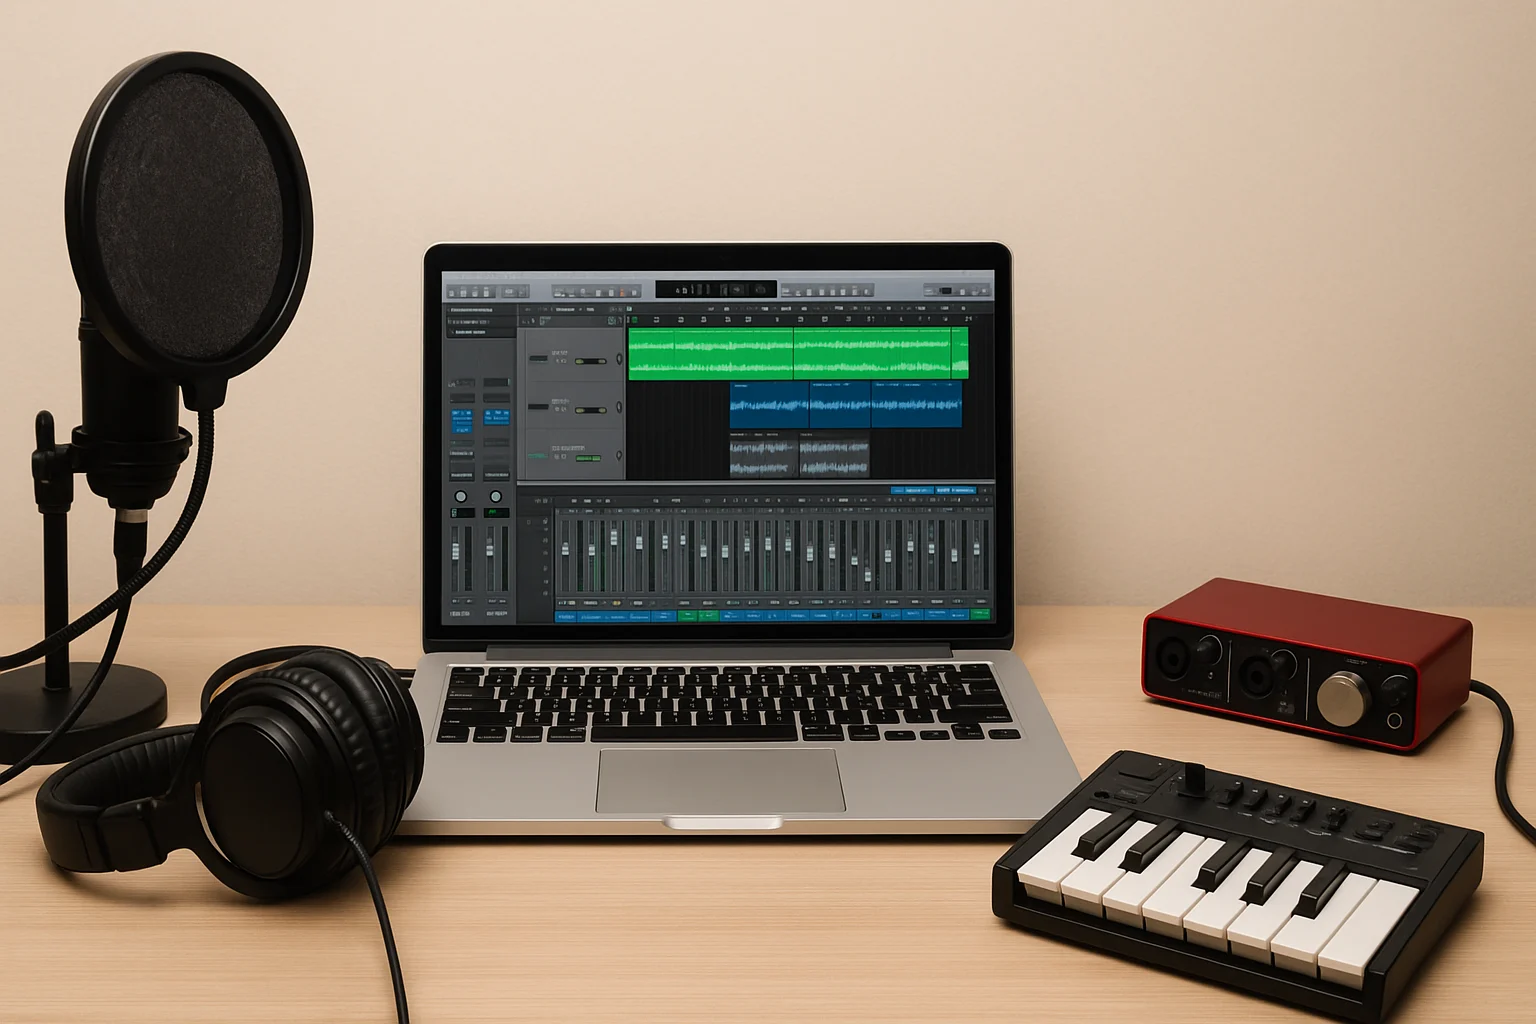
Essential Gear on a Shoestring
Your computer (laptop or PC) is the heart of the studio, but it doesn’t need to be a monster. A mid-range laptop or desktop with a few gigs of RAM can run recording software just fine. Focus on enough memory and disk space for your projects.
Next up is the audio interface – this is what plugs into your computer and lets you hook up mics and guitars. For beginners, Focusrite and PreSonus are go-to brands. Models like the Focusrite Scarlett Solo or PreSonus AudioBox are usually under $150 and come with clean preamps. They’re “easy to set up, sound clean, and don’t overcomplicate things”. Start with a 1-in/2-out interface (one mic input, one guitar input), and you can always upgrade when you need more tracks later.
For microphones, you don’t have to mortgage your house. A solid all-around choice is a large-diaphragm condenser mic (if you record vocals or acoustic guitar), or a dynamic like the Shure SM57 for amp sounds and loud sources. The Audio-Technica AT2020 is an example of an affordable condenser that covers vocals and instruments wellm. Shure’s SM57 or SM58 dynamics run under $100 and are rock-solid for guitars, drums, and even vocals. As Side-Line Magazine says, “you don’t have to drop $1000+ on a mic when you’re starting out” – a $100 mic will do most beginners just fine.
Headphones or monitors? Ideally both, but on a tiny budget, start with closed-back studio headphones. They’ll prevent sound from leaking into your mic. A popular pair for home studios is the Audio-Technica ATH-M50x – solid sound at a reasonable price. (If you bump up budget later, adding small studio monitors like KRK Rokits or Yamaha HS5 can help you hear your mix more naturally.) Avoid cheap earbuds for mixing – you want something that shows you the full frequency range. A single good pair of headphones will cover recording and basic mixing.
You might also grab a small MIDI keyboard/controller if you plan to add virtual instruments or beats. Options like the Akai MPK Mini Mk3 or Arturia MiniLab 3 (both around $100 new) give you keys, pads and knobs to play synths and drum rack. They’re not mandatory, but a compact MIDI keyboard can really speed up producing melodies or rhythms in your DAW.
In summary, your home studio equipment for beginners list looks something like this:
- Computer/Laptop: any recent model, with decent RAM.
- Audio Interface: e.g. Focusrite Scarlett Solo or PreSonus AudioBox.
- Microphone: e.g. AT2020 condenser or Shure SM57 dynamic
- Headphones: closed-back, like ATH-M50x (or affordable equivalents).
- (Optional) Studio Monitors: Yamaha/ KRK entry-level if you find room/budget.
- (Optional) MIDI Controller: e.g. Akai MPK Mini Mk3 or Arturia MiniLab 3.
With just these pieces – nothing overly fancy – you have a solid core for a budget home recording studio.
Helpful Extras and Accessories
Once you have the basics, pick up a few cheap accessories that make life easier. A microphone stand is a must – it holds your mic steady in the perfect position (no one wants to hold the mic in their hand while singing). Pair that with a pop filter (the round foam or mesh that clips in front of a vocal mic) to tame plosive “p” and “b” sounds. These cost under $20 total but instantly make vocals sound cleane. Also grab a few good cables: at least one XLR cable (for your mic) and maybe a 1/4″ guitar cable. Cheap patch cables and adapters can add up, so factor them in.
Other little things to consider:
- Mic shock mount: if your interface didn’t come with one, a simple mount avoids bumps and thumps reaching the mic.
- Headphone amplifier (splitter or small amp): if you want to share listening or have the headphones off one guy.
- Desk or table: sturdy enough for your gear, free of clutter.
- Extension cords or power strips: to reach everything safely.
All these extras fall under smart home studio equipment for beginners choices. You’ll notice they’re inexpensive compared to pro studio gear, but they help you avoid headaches (like handling noise and cable chaos).
Pick Your Software (DAW)
Next, let’s talk software. Luckily, you have several free or low-cost DAWs to choose from – the “brain” of your home studio. For example, Audacity is a completely free, open-source DAW available on Windows, Mac and Linux. It’s pretty simple (no MIDI tracks) but great for recording and editing audio if you just need to capture performances. Another powerful free option is Cakewalk by BandLab (Windows only). Cakewalk has all the pro features you need and is totally free.
For more advanced work, REAPER is a popular choice: it’s not free, but it comes with a 60-day full-featured trial, and then a discounted license for just $60. REAPER can handle unlimited tracks and plugins, and many pros swear by it. (Warren Huart of Produce Like a Pro, for example, uses REAPER in tutorials.) If you’re on a Mac, GarageBand is a no-cost DAW that’s surprisingly capable (and should already be on your computer).
In short: start free with any of these DAWs. They often include built-in effects (EQ, reverb, compression) and instruments to get you going. Many audio interfaces even bundle a free version of a DAW (like Ableton Live Lite or Studio One Prime) – so check what software comes in the box. The key is to get comfortable laying down tracks, and you can upgrade later. When researching “cheap audio recording setup” options, you’ll see many beginners start with this route: Audacity for vocals/podcasts, Cakewalk for full music projects, or REAPER if you’re ready to invest a bit for longevity.
Workflow Tips for Beginners
Once you have gear and software, a good workflow keeps the creative juices flowing. Stay organized: name your tracks, keep instruments grouped (drums with drums, guitars together, etc.), and color-code if your DAW allows it. As one mixing guide notes, many home projects “involve dozens of tracks, which often leads to a messy workflow and lots of CPU usage” – so get organized from the start. For example, export each instrument to its own stem or bus (drums, vocals, bass, etc.) so you can mix on those stems if CPU gets tight. Use simple folder tracks and markers to label song sections (verse, chorus) as you record.
Also use presets and templates to speed things up. Most DAWs and plugins come with free presets for EQ, compression, amp sims, etc. Pick a preset close to what you want and tweak it – this saves time (and headache) over trying to dial knobs from scratch. Make a basic template project that opens with your interface and mic already routed, so you’re recording-ready as soon as an idea hits.
And don’t be shy about learning from YouTube experts. There are tons of free tutorials on how to mix tracks, route your interface, or write songs in a DAW. In fact, many established engineers share tips online – just check out channels like Dave Pensado’s or Warren Huart’s Produce Like a Pro. They often break down mixing basics and home studio tricks in plain English. Watching a quick guide on EQ or leveling can save you weeks of trial-and-error.
A few other mixing basics: use one of your finished tracks as a reference (listen on phones and car speakers to see how it sounds) before finalizing your mix. Take breaks often (your ears get tired fast). And remember the “less is more” rule – don’t overdo it with plugins or tracks. If something isn’t adding much, mute or remove it. Focus on the performance and vibe first; mixing magic (EQ, reverb) comes later. There’s no substitute for practice, so start recording songs ASAP – you’ll learn the ropes by doing.
Example Budget Buildouts
To make it concrete, here are a couple of example cheap audio recording setups by budget:
- Under $200: If you truly have $200 or less, consider a portable recorder like the TASCAM DP-006 ($169). This little 6-track pocket studio runs on batteries and has built-in mics – plug in a guitar, sing, and you’re recording layers right away. It’s not studio quality, but for demos it’s a steal. (Bruce Springsteen famously wrote Nebraska on a portastudio, after all.)
- Around $500: A more typical home studio setup in this range might be: Focusrite Scarlett Solo interface (~$110) + Audio-Technica AT2020 mic (~$100) + ATH-M20x headphones (~$50) + cables and mic stand ($30). That’s about $290 so far. Add a cheap vocal shield or DIY foam ($20) and you’re still under $350. With the rest, grab a simple USB MIDI keyboard ($70) or stash away for a better mic later. This get-up easily crosses cheap audio recording setup territory, but still packs a punch for the price.
- Around $1,000: If you stretch to $1,000, you could upgrade the above with a second mic (e.g. a drum or instrument mic), a proper pair of studio monitors (~$300/pair), and a more powerful laptop. But it’s not required to start there; the point is you can begin small and grow. Even with $500, you’d have more gear than many podcast setups.
No matter your budget, remember: start with the essentials and add gear only as you need it. Many pros also started with just a mic, a laptop, and a dream. With each new purchase, ask “Will this help me make better music now, or can I learn more with what I already have?” That mindset of smart buying (splurging on must-haves like a good interface, and skimping on non-essentials) was key in that Audient guide: “Spend when it’s essential and save when it’s practical”.
Creative Freedom, Not Just Saving Money
Keep in mind that a budget home recording studio isn’t just about pinching pennies – it’s about creative freedom. As one blogger puts it, home studios let you capture inspiration anytime without worrying about renting a room. You don’t need a soundproof castle; you need your own space to experiment. In fact, having limitations can be an advantage. Amped Studio notes that when you’re limited to “just one plugin or piece of gear, you’ll learn it inside out, discovering creative ways to make the most of it”.
At the end of the day, it’s not how fancy your studio is that matters, but what you do with it. “Building a home studio isn’t about having tons of equipment. It’s about making the most of what you’ve got,” says Amped Studio. A cozy, motivated space and the freedom to hit record whenever you want will take you far more than any expensive gear could.
So take a deep breath and dive in. With just a little gear and a lot of passion, your budget home recording studio will be ready to take your songs from your head into the world. Who knows – maybe the next home-grown hit will come from your basement late-night jam session. You’ve got this!